Friday, May 24, 2013

The Crimson Fly: Issue 1-Preview

ITS AN ANIMATED COMIC STRIP! No, its not my thesis but its very close. Doing this allows me to work out kinks in my technical abilities and process, so I'm not figuring things out as I'm working on that. This, and my thesis will be fully released next year, but for now, here's a sneak preview! Don't forget to spread and share the word!

Link: http://skipperwing.deviantart.com/art/The-Crimson-Fly-Issue-1-Preview-373351313


Wednesday, May 15, 2013

Dilemma

Soo...
I was thinking about things to upload for today's post when I ran into a dilemma (hence the title of the post). The things I was considering posting for today were my pre-visualization/color script boards.  They basically help me come up with the general gist of the story, as well figure out who the colors are going to work from scene to scene.

Just one problem.

They give away the story.

You can see how this could/would be a problem.

This actually leads into a greater problem I'm currently having: I'm at a stage where I simply can't show the things I'm working on.  Currently, I'm at a stage where I'm working out the script, ironing out storyboards/pages, and generally getting things ready so I can start animating/illustrating over the summer.  All of these are things I can't show publicly without spoiling what you came here to watch.

That doesn't mean that this blog is done, by any means.  There are a few posts I can make regarding process, similar to the poster post (seen here), as well other assets needed to make this dream of mine a reality.  And once the all the pre-production is done, I want to start Livestream-ing my process of drawing, illustrating, and animating my comic, so you guys can see my process, and I can analyze it and make it better! How's that?

As for the short term, well, I'm not entirely sure. I hate to ask this, but I'm going to need you guys to give me a week. Both to think about where to go next with this blog until the livestream-ing starts, and what to do in the short term should I decide not to take an immediate break.

In the mean time, if you have questions, leave a comment!  If its about characters, the nature of the project, or process of creation, I'll answer as best I can (or be as amusing as possible).

Thanks! And I'll see everyone in a week!


Monday, May 13, 2013

Environment Concept Design: The Caves beneath Sewers

Continuing from last week, I'm gonna be talking environments.  Admittedly, this is working a little differently than I'd like, as concept art needs regarding environments shift depending on the panel with this medium (A fancy way of saying I'm quite sure what I need and I'm making up as much  as I can as I go).  That said, the tighter your pre-production, the easier it is when you actually start working. So, here we go!


These are the caves beneath the sewers.  The prevailing idea is that either these were extensions to the sewers that were never finished, or they were pre-existing caves that the sewers just happened to connect to.  No one really knows; there's proof for both (ladders and other architecture vs. hollowed out walls). 

Design-wise, I wanted this to be really simplistic. At first it was going to be just BLACK with just the characters, but that was just a bad idea.  I need SOME sort of environment. So, instead, I'm doing just slight highlights and reflections, with just the hole as a source of light.   Enough info so that you can see everything, but not so much that you don't see how DARK its supposed to be. Hope you're not afraid of the dark and/or the horrors within! hehehehehehehehehehehehe.......

Friday, May 10, 2013

Environment Concept Design: The Sewers

Continuing from where I left off about a week ago, I'm gonna be talking environments.  Admittedly, this is working a little differently than I'd like, as concept art needs regarding environments shift depending on the panel with this medium (A fancy way of saying I'm quite sure what I need and I'm making up as much  as I can as I go).  That said, the tighter your pre-production, the easier it is when you actually start working. So, here we go!


Ahh.. the eponymous sewers.  I have to admit, I am free-styling it a bit with the sewers. At first I was really worried that I would be deviating a lot from reality, but luckily I was able to find a ton of reference (which I'd post if it weren't for copyright and all that jazz).  In the bottom sketch, you can see the giant hole caused by Hobo Joe.  Initially, I had the street intact, but then I realized that Joe was way too big for any manhole and so I had a more fitting idea.  Next time, we're going a little deeper!

Wednesday, May 8, 2013

Promotional Poster: Process

Hey everybody, and welcome to the tutorial no one really wanted about illustrating and coloring in flash. Well, partly in flash. Really, this is just about my current process for drawing stuff, and'll teach you how to go from this:
 to this :

Ready? Let's get started.

So first off, I start with a basic thumbnail ...in photoshop? Well, yeah. Flash is awesome and all, but because its a vector based program (it uses math to calculate your every stroke) as opposed to a raster based program (it uses pixels) you don't get the sort of cool opacity based doodling you'd get with a pencil ...or photoshop, since it emulates it pretty well. So I do my basic thumbs and pencils in photoshop.
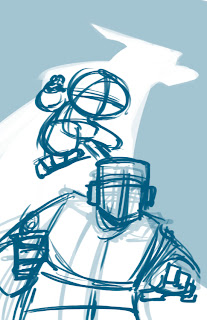
On that note, once I'm satisfied with those thumbs, I do a second thumbs pass? well, this is weird and awkward. Normally, I'd go straight into pencils, but because this is a promotional illustration, I'm being extra careful. The reason for this is I'm a firm believer of making the next step easier for the next guy in the production pipeline, even if that person is yourself.  That way, that person can focus on what they're supposed to do instead of always defaulting back to you whenever they have a problem they can't understand.  So have a second round of thumbnails, this time fleshing out character details.  
Now that I have a more fleshed out thumbnail, we're going into "pencils" (said in quotes because this is digital).  I start with the furthest character back because its easier to focus on his lineweight being normal rather than starting with the character in the front and worrying if the front guy's lineweight is overpowering the back guys. Start in the back and you don't have that problem.

Let's see what that looks like. Hmmm... Looks good to me! Let's move on.


Now for the guy in the front. Its important to note that we're also establishing lighting with our characters and that its important to keep it consistent. You can have multiple light sources (and its important to use rim lighting to highlight parts of your character that are important to see but would normally be obscured by shadows), but in a pinch, keep it as simple as possible, to a single light source if need be. In this case, I'm implying that whatever's reflecting off his flashlight is illuminating both characters.


With them illustrated, its now time for the rat in the background. You may have noticed that there is a flow to the illustration onscreen. It goes from the Rat, to the Crimson Fly (the jumping character) to Officer Jones (the jumpsuited guy).  Or vice versa. This is called leading the eye and its pretty much what composition is all about.  When you lead the eye of the viewer, You tell them what to look at, and make it easier on them to know what parts of your piece to enjoy. This is important in all visual media (illustration, comics, film, video games) as the prettiest art in the world can still be boring if you don't know where to look.


Now that Pencils are done, we can import them into the properly set up flash file (for those who don't know, in Flash: file->"import to library"->select your file->open).  I don't import directly to the stage because I don't want flash to automatically turn it into a symbol that I have to rename. No, I take it from the library, and do it myself.

Now that its on the stage, I turn into a graphic symbol (select it -> F8) so I can change the color effect (on the right, in "properties") and turn down the opacity/alpha so I can ink over it.

With that done, I now repeat same process the pencils. Start in the back and move foward with my inks. I'm just using the regular brush tool, at the third circle size with the pressure and tilt settings turned on. Also important to note: I have the smoothing set to 40.  Smoothing is the amount of correction flash will apply to a single brush stroke. 100% is your old art professor fixing everything. 0% are those scraggles you made when you were 2 years old. I like to vary depending on the situation. When I'm roughing out animation, 30%. When I'm inking, 40%.


Now that the Fly is done, I turn to Officer Jones. Its worth noting that because my pencils were clean, I'm not having to guess what I was intending when I did the pencil. Making it that much easier for the next guy in the pipeline.


And now all the inks. It's time for coloring...welll... not yet.  First, we're going to fill in some grays to help the characters pop from the background when we add color.


Annd done. Now for some color. Here's where it gets tricky. I'm going to do some things that I would not recommend anybody else to do. Its more of a "follow the intent, not the letter" sort of thing. You with me?


The next thing I'm going to do is fill in the character colors.  This has more to do with the fact that I'm working in flash, than it says about my painting.  Its also about keeping things organized.  Filling in the character colors allows me to keep the characters popped out from the background rather than having them faded in.  Plus, having already done the grays, I don't have to worry about shading.


Now we add the background. I'm going to confess that its really rough for two reasons: 1. I didn't use my reference files (which you should have and use whenever possible) to draw this, and 2. I didn't really care about the environment as long as the characters popped out of it.  Which is bad. Don't do that. Establish your characters (they're what we focus on) and then use them to establish your environment.  These backgrounds are drawn at a lower opacity so they don't detract and distract from the characters.


Now that that's done, its time for some lighting! Another do as I say and not as I do: DON'T USE GRADIENTS. Yes, that's exactly what I did, but there's a good reason. Subjectively speaking, I make them look good (RE: SUBJECTIVELY SPEAKING. IF YOU DISAGREE, THAT'S TOTALLY COOL). Once you know how to work without them, its easier to use them. So do that first.


Now that we've established our basic lighting, let's give it some colored lighting. Something to establish both the mood of the environment, as well as separate it from the characters. First I start a gradient overlay, but that really isn't enough so I added a blue overlay on top of that.  You can see how this pushes the characters out of the environment.


Next we do an overlay over the entire composition.  This helps unify all the elements together, as well as separate it from any graphic design elements that we want audience members to read.  Just as with the environment, the first overlay really isn't enough, so we're going to push it with a second overlay.


Throw in a light for the flashlight, and the logo, and we're done!  Thank you for sticking around this long, and I hope you'll stay tuned for more process stuff from me!


Monday, May 6, 2013

Following the Blog

Okay! I finally got Blogspot to invite people to follow the blog! So, if you have a blogger or Google plus account, I'd totally appreciate your following my blog! Get updates as they happen, rather than waiting for them to be posted to Facebook! Thanks, and I'll see you Wednesday!

The Crimson Fly: Promotional poster

I didn't really like that the profile picture on facebook was a sketch I'd done half a year ago.  Also, I want  to get some posters up in my school's animation building so I can get more people tracking this stuff.  So I made a poster that gives you the basic premise.


Much better, I think.  That said, there's no info on it yet, because, while I do want more publicity, I also want to be specific about the kind of publicity I want.  I like having you guys watch me work, but I also know that some of you guys may want to help, and aren't sure what you can do beyond promoting it. Well, to be honest, I'm not quite sure either. But when I do, I'll definitely let you know. In the meantime, enjoy this sweet poster.  It also serves as a preview as to what the comic is going to look like. Any questions? Drop a comment!

Friday, May 3, 2013

Environment Concept design: The Alleyway

So, for this next set of concept art, I'm gonna be talking environments.  Admittedly, this is working a little differently than I'd like, as concept art needs regarding environments shift depending on the panel with this medium (A fancy way of saying I'm quite sure what I need and I'm making up as much  as I can as I go).  That said, the tighter your pre-production, the easier it is when you actually start working. So, here we go!

So. The alleyway. There's nothing really special about it aside from the fact that the action has to start somewhere and this is how.  There's not much more I can really say about it without giving away plot stuff, so you're just going to have to infer and guess as you will. You're smart guys; by the time I get food, I'm willing to bet some of you will guess the plot!

Wednesday, May 1, 2013

Character Design: Alice Cho

For my last two characters, unfortunately, all that exists of them is a model sheet.  Because I'm on a pretty tight deadline, and these characters appear for a relatively short time in the project, all they get is a model sheet.  Sucks to be a minor character, and hopefully, if I have time, or when they recycle back into the main plot, I'll give them full how-tos, but until then, there you go.
Here's the last character in the Crimson Fly intro story: Alice Cho.


Some facts about Alice:
  • She's a college student. Specifically a junior.  History major. 
  • Her middle name is Beatrice. Yes, her initials are ABC. It helps me remember better.
  • She has a younger sister.
  • Just like Detective Dick, she had a different design; in her case, a long coat and dress.  But a change in personality ruined that fit, and thus she's in a jacket and jeans now.

Alice has the misfortune of being in the wrong place at the wrong time.  Repeatedly.  That's where the Crimson Fly comes in. Unfortunately, he usually just makes things worse. She began life as a bystander in a previous iteration of the Crimson Fly (see above) and in that incarnation would have been a reoccurring character who keeps running into the Crimson (then "Red") Fly, and eventually gets sick of it.  This current iteration is a lot stronger than the previous version, being more of a person rather than a plot device.  Well, in the strip proper.  As stated above, she's a minor, but important, character in this intro. Keep reading to see more of her and where her journey takes her!

The story in the preview can be read here in its entirety:
http://skipperwing.deviantart.com/gallery/38606483